 Previous Page Next Page
It is important for different parts of a visualization to be fully consistent. When you filter or sort on any data, you will want this to be reflected on all or a certain set of data components (crosstabs, tables, charts, KPI components, and geographic maps) in the same dashboard. JReport allows you to achieve the synchronization by means of sending and receiving messages in a dashboard.
The messages that can be sent and received in a dashboard for synchronization includes the built-in messages Filter, Sort and Parameter, and user customized messages. The built-in messages are predefined with corresponding web actions.
Sending and receiving messages can also be predefined when creating library components in JReport Designer. For details refer to Delivering Messages Between Library Components in the JReport Designer User's Guide.
Synchronization messages can be sent out when clicking specific objects in a dashboard, which include independent labels (labels outside of data components), labels in tables/crosstabs/KPI components, data fields, special fields, data markers, legend and category axis labels of charts, markers and areas in geographic maps, parameter controls, and the Submit button of parameter form controls. These objects are referred to as the synchronization trigger objects.
You can either make synchronization messages sent out automatically by using the built-in messages or define customized messages on your own. In a customized message you can specify to send out multiple messages from one trigger object and edit the message information as you want. The following built-in messages are provided:
To send out a built-in synchronization message:
Select a trigger object, right-click it and click Send Sync > Filter/Sort/Parameter on the shortcut menu (Filter and Sort are not available for the Submit button of parameter form controls). Then when the trigger object is clicked, a corresponding built-in message will be sent out. If the trigger object is an independent label, you need to manually specify the message receivers; if it is one of the other objects, the message will be automatically received by data components in the current dashboard as follows:
If you want to view or edit the message a data component automatically receives, you can make use of its Receive Sync dialog. While for the Parameter message, if some data components are contained in one library component, the dialog is only available on the first data component in the library component.
To send out a customized message:
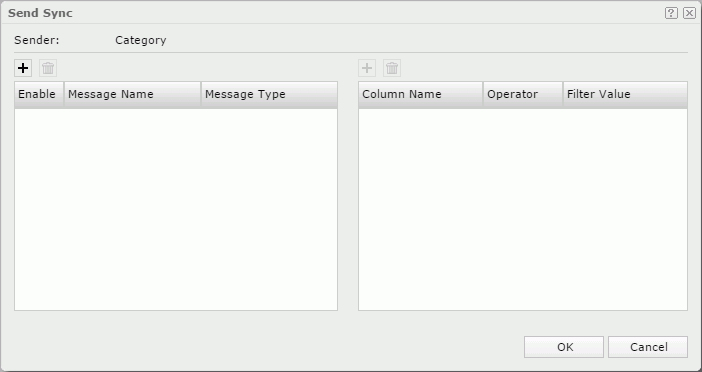
 to add a message line, select the type of the message from the Message Type drop-down list, which can be one of the built-in messages Filter, Sort and Parameter or User Defined. A message name is then automatically displayed in the Message Name column. Double-click in the column to edit the message name if needed.
If the object has been predefined to send messages in JReport Designer, they will be listed in the message box marked with  and you cannot modify them.
above the message information box to add a message key-value line.To delete a message key-value line, select it and click  .
.
Tip: You can also create a blank user defined message without specifying the key and value.
To delete a message, select it and click above the message box. Messages predefined in JReport Designer cannot be removed.
To disable some messages, uncheck the checkboxes in the Enable column. Disabled messages will not be triggered.
The data components (tables, charts, crosstabs, KPI components, and geographic maps) in a dashboard can be used as the message receivers to receive messages that are sent out from any objects in the dashboard. When a data component receives a message, it will perform the actions defined in the message, such as filtering, sorting itself using conditions defined in the message, re-running with parameter values in the message, or changing its object properties. You can make multiple data components receive the same message and respond the same action with the same conditions so as to achieve the data synchronization between the data components.
To make a data component in a dashboard receive messages and respond corresponding web actions, take the following steps:

If the data component has been predefined to receive messages in JReport Designer, they will be listed in the dialog marked with .
to add a message line.To delete a message, select it and click above the message information box. The messages predefined in JReport Designer cannot be removed.
To disable some messages, uncheck the checkboxes in the Enable column. Disabled messages will not be received by the data component.
To edit the filter conditions for the built-in Filter message:
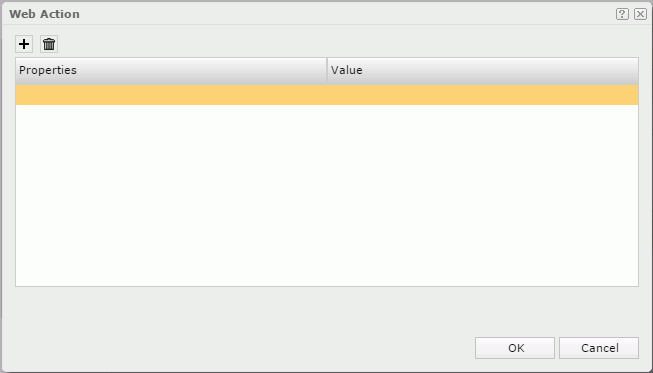
 in the Actions column. The Web Action dialog appears.
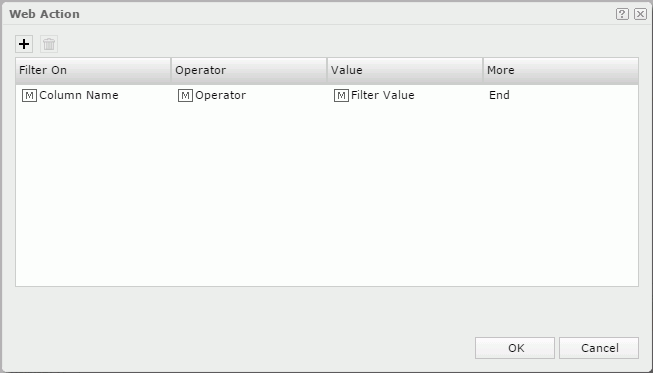
to add more filter conditions to filter other field values and specify the relationship between the conditions in the More column.
To delete a filter condition, select the condition and click .
To edit the sort conditions for the built-in Sort message:
in the Actions column. The Web Action dialog appears.
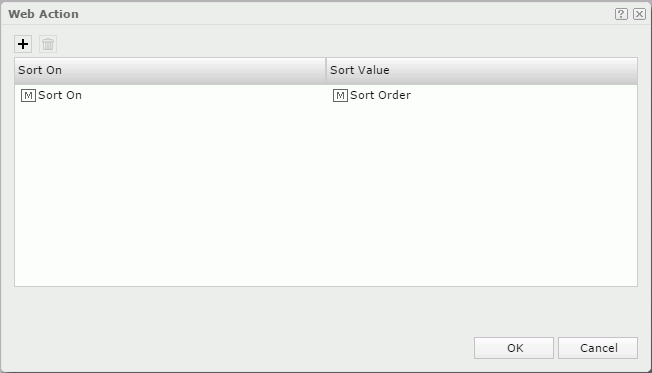
to add more sort conditions to sort other fields.
To delete a sort condition, select the condition and click .
To edit the parameter values for the built-in Parameter message:
in the Actions column. The Web Action dialog appears.
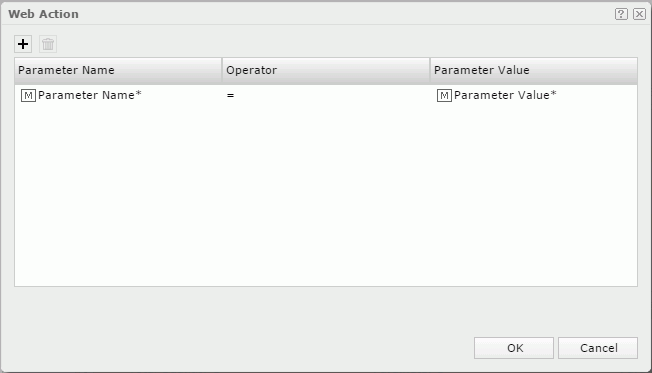
Specify the parameter and the value of the parameter from the Parameter Name and Value drop-down lists. The operator can only be =.
Parameter Name* in the Parameter Name drop-down list means that all the parameters defined in the message will be used to re-run the data component, and its corresponding value can only be Parameter Value* that represents all the parameter values..
In the Parameter Name and Value drop-down list, you may also find some items have the icon  ahead of them and they are listed under the Message Key node. If you choose an item of this type, it means the item will not be used directly in the parameter condition, instead, it will be mapped to a key in the message and JReport will search for the value that is specified to the key from the message first and then use that value to compose the parameter condition.
to add more parameter lines to specify other parameter values. If you specify a parameter value more than once, the last setting takes effect.
To delete a parameter line, select it and click .
Click OK to accept the settings. Then at runtime, when the data component receives the message, it will re-run itself, using the predefined parameter values.
To respond the Filter web action for a user defined message:
The Filter web action enables you to filter the records of the data component when it receives the message.
in the Actions column.To respond the Sort web action for a user defined message:
The Sort web action enables you to sort the records of the data component when it receives the message.
in the Actions column.To respond the Parameter web action for a user defined message:
The Parameter web action enables you to run a data component, especially a data component with parameters using predefined parameter values, or re-run the data component with predefined parameter values when the message is received.
in the Actions column.If the specified data component contains parameters, the parameters will be automatically listed in the parameters box. Specify the value for each parameter.
To respond the Property web action for a user defined message:
The Property web action enables you to change properties of the data component itself when it receives the message.
in the Actions column. The Web Action dialog appears.
In the two drop-down lists, you may find some items have the icon ahead of them and they are listed under the Message Key node. If you choose an item of this type, it means the item will not be used directly in the property changing condition, instead, it will be mapped to a key in the message and JReport will search for the value that is specified to the key from the message first and then use that value to compose the property changing condition.
to add more property lines to change values of other properties.To delete a property line, select it and click .