 Previous Page Next Page
Insert Crosstab
This dialog appears when you drag Crosstab from the Components panel to the destination. It helps you to insert a crosstab to a report.
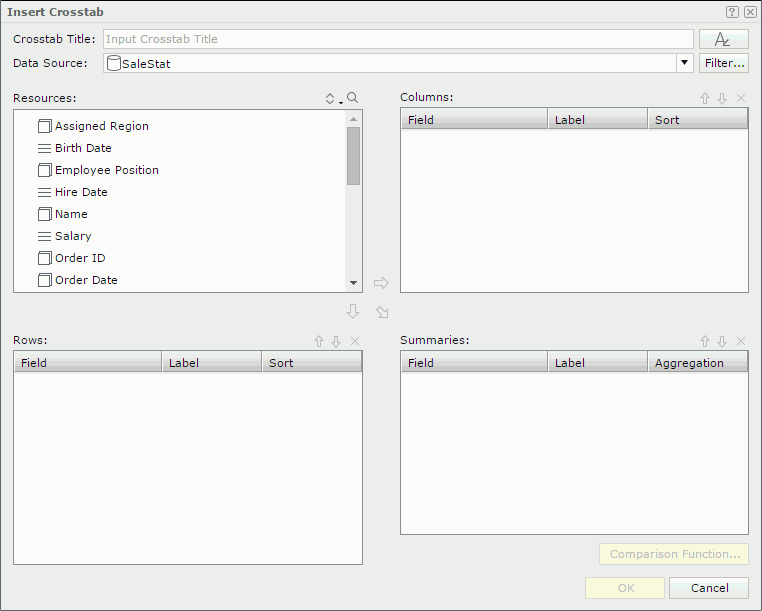
Crosstab Title
Specifies a title for the crosstab.

Specifies the font properties of the crosstab title.
- Font
Lists all the available font faces that can be selected to apply to the title.
- Font Style
Specifies the font style of the title. It can be one of the following: plain, bold, italic, and bold italic.
- Size
Specifies the font size of the title.
- Align
Specifies the position of the title to be left, right, center or justify.
- Font Color
Specifies the font color of the title.
- Background Color
Specifies the background color of the title.
Data Source
Specifies the business view in the current catalog on which the crosstab will be built.
Filter
Opens the Query Filter dialog to specify the filter which you want to apply to the selected business view.
Resources
Displays the elements in the selected business view.

Sorts the view elements in the specified order from the drop-down list. Once a user changes the order, it will be applied to all the resource trees where business view elements are listed for this user.
- Predefined Order
Sorts the view elements in the order defined in the Business View Editor on JReport Designer.
- Resource Types
Sorts the view elements by resource type, namely category objects come first, then group objects, then aggregation objects, and at last detail objects.
- Alphabetical Order
Sorts the view elements in alphabetical order. Elements that are not in any category will be sorted first, then the categories, and the elements in each category will also be sorted alphabetically.

Launches the quick search toolbar to search for view elements. For the usage of the toolbar click here.

Adds the selected group object  to be displayed in the columns of the crosstab.

Adds the selected group object to be displayed in the rows of the crosstab.

Adds the selected aggregation object  or detail object
  to be the summary field of the crosstab.
Columns/Rows
- Field
Lists the group objects that will be displayed in the columns/rows of the crosstab.
- Label
Specifies the display names for the selected group objects. You can click in the cells to edit them if required.
- Sort
Specifies the sort order of the group objects.
Summaries
- Field
Lists the objects that you select to create summaries.
- Label
Specifies the display names for the selected objects. You can click in the cells to edit them if required.
- Aggregation
Specifies the functions used to summarize data of the selected detail objects.
- Comparison Function
Opens the Comparison Function dialog to add a comparison function as an aggregate for the crosstab.

Moves the selected view element one level up.

Moves the selected view element one level down.

Removes the selected resource.
OK
Inserts a crosstab and closes the dialog.
Cancel
Cancels the insertion and closes the dialog.

Displays the help document about this feature.

Ignores the setting and closes this dialog.
Previous Page Next Page