 Previous Page Next Page
Configuring Logs
JReport provides a robust, flexible and configurable logging system, which is based on log4j version 1.2.8. JReport also supports versions of log4j version 1.2.8 to 1.3alpha7.
The logging system is used for obtaining meaningful and helpful JReport logging information in a convenient way. It is easy to configure and manage. The following are the significant benefits of the JReport logging system:
- It is compatible with your application which is based on log4j.
- It can be configured to output the logging information of different modules separately or to output them all together.
When the Organization feature is enabled, each organization has its own log files. By default in the <install_root>\logs folder there are some .log files, they are for non-organization logs. For each organization there is a specific folder using the organization name and containing a set of log files for the organization. When system admin defines detailed settings about server log (log level, etc.), the settings will be applied to all organizations. Organization admin cannot configure logs.
To configure the JReport logging system:
- On the JReport Administration page, click Configuration on the system toolbar and then select Log from the drop-down menu to open the Configuration - Log page.
- From the Log Type drop-down list, select a log category.
- Engine
Uses the "Engine" log if you want to log the events related to running reports, that is creating report results or exporting reports. Reports are run by the Engine component of JReport Server.
- Page Report
Uses the "Page Report" log if you want to log the events related to end users modifying and saving page reports, including Ad Hoc and analysis features supported by Page Report Studio.
- Access
Uses the "Access" log if you want to log which users accessed which services, such as report running service and task scheduling service.
- Manage
Uses the "Manage" log if you want to log the events related to modifying settings in the JReport Administration console or server.properties.
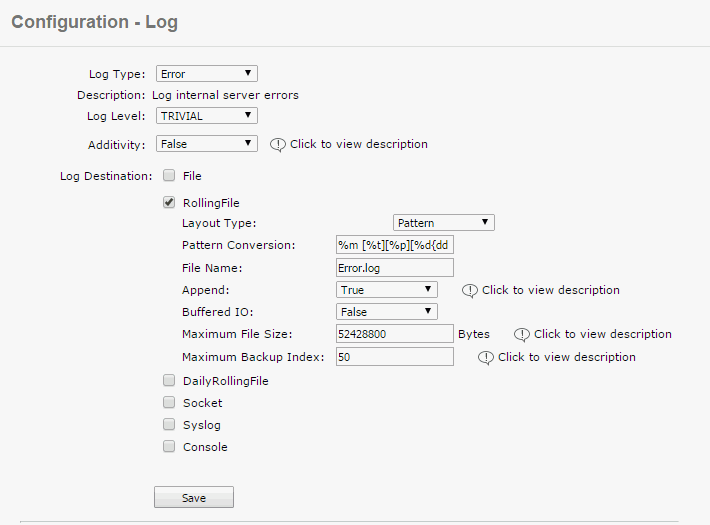
- Error
Uses the "Error" log if you want to log errors in any of the categories.
- Event
Uses the "Event" log if you want to log the events related to the lifecycle of the server instance, such as its start time and stop time.
- Debug
Uses the "Debug" log if you want to log the events most likely needed for debugging purposes, such as the exact SQL statements used to query the database.
- Performance
Uses the "Performance" log if you want to analyze the performance of report result or export operations.
- Dump
Uses the "Dump" log if you want to log events related to at what time what action is started or ended during the process of running tasks. For example, when the task is submitted, when the task is run, when the Engine is initiated, and when the Engine is stopped.
- From the Log Level drop-down list select the log level of the specified log type.
The JReport logging system enables tracing both normal and abnormal situations by using log level, for example, something expected or regular such as tracing a program workflow, logging runtime information and associated elements, and something unexpected or irregular like when a URL is unreachable, a file does not exist, or a table cannot be found in a data source. Log level is divided into the following eight levels, and is ordered according to the amount of information logged, from the least to the most. If you want the least amount of information to be logged, you can set log level to FATAL. If you want the most amount of information to be logged, you can set log level to ALL. Setting it to the highest level could affect system performance as well as disk usage.
- OFF
Specifies not to use the log level.
- FATAL
The FATAL level specifies severe error events that will presumably lead the application to abort, for example, failing to read the valid key, and exceptions that result in feature uncompleted.
- ERROR
The ERROR level specifies error events that may allow the application to continue running, such as failing to load a report, failing to find a catalog file, failing to parse a parameter, and failing to create db buffer.
- WARN
The WARN level specifies potentially harmful situations, such as failing to find the resource, or having found invalid query or formula with grammar error when loading a catalog.
- OUTLINE
The OUTLINE level specifies an outline of program workflow, and dump global variables, including a single thread, multiple threads, the time for when to begin to fetch data, and success in exporting to the specified result format.
- INFO
The INFO level specifies informational messages that highlight the application progress at a coarse-grained level, and important local variables, such as query, parameter, formula value used when running reports, connection information, and SQL statement.
- TRIVIAL
The TRIVIAL Level specifies fine-grained informational events most useful in tracing an application. Such as the report structure dump, or the result set dump.
- ALL
The ALL level logs all the information that the other levels log.
- From the Additivity drop-down list specify whether a child logger will inherit all the appenders defined by its ancestors.
- To output log contents to the FileAppender that requires a layout, select the File checkbox, then:
- From the Layout Type drop-down list select the layout type used to format the log contents: Pattern, HTML, XML, TTCC or Simple.
- When Pattern is selected as the layout type the Pattern Conversion option is available. Set the conversion pattern as required. The use of the following conversion characters results in the slow generation of caller class or location information: %C, %F, %L and %M , so their use should be avoided unless execution speed is not an issue. For more information about the pattern conversion see comments on conversion pattern in the LogConfig.properties file located in
<install_root>\bin directory.
- In the File Name text box enter the name of the log file to which the appender will output the log contents. The suffix of the log file name is .log. By default the log file is saved in the
<install_root>\logs directory, you can
enter the file name with an absolute path to save the file to your desired location,
for example: C:\logs\Engine.log.
- From the Append drop-down list select whether or not to retain the old contents of the specified file.
- From the Buffered IO drop-down list specify whether to create a buffer for the log IO.
- The RollingFile checkbox is selected by default which is to output log contents to the RollingFileAppender that requires a layout. You can configure the same settings as FileAppender for the RollingFileAppender, plus you can specify the maximum file size of the appender in the Maximum File Size text box (the logging system will create a new rolling file when the file size exceeds the maximum file size) and specify the maximum number of the latest rolling files that will be retained by the logging system in the Maximum Backup Index text box.
- To output log contents to the DailyRollingFileAppender that requires a layout, select the DailyRollingFile checkbox, configure the same settings as FileAppender, then in the Date Pattern text box specify the data pattern used to generate the daily rolling file.
- To output log contents to a remote log server, select the Socket checkbox, then in the Remote Host text box, specify the host name where the Socket Server is located, in the Port text box specify the port number on which the Socket Server listens, in the Delay text box specify the timeout interval value for when a client attempts to create a socket connection, and from the Location Information drop-down list select whether or not to output the log location information to the socket stream. The SocketAppender does not need a layout.
- To output log contents to a remote syslog daemon, check the Syslog checkbox, then:
- From the Layout Type drop-down list select the layout type used to format the log contents: Pattern, HTML, XML, TTCC or Simple.
- When Pattern is selected as the layout type the Pattern Conversion option is available. Set the conversion pattern as required.
- In the Syslog Host text box specify the host name where the Syslog server is located.
- From the Facility drop-down list specify the facility name that is used by the Syslog.
- From the Facility Printing drop-down list specify whether or not to print the facility information.
- To output log contents to the standard stream of Java console, select the Console checkbox, then from the Layout Type drop-down list select the layout type that is used to format the log contents. When Pattern is selected as the layout type the Pattern Conversion option is available. Set the conversion pattern as required. From the Target drop-down list specify the standard IO target of the Console.
- System.out
If selected, the log contents will be outputted to the standard output stream of the console.
- System.err
If selected, the log contents will be outputted to the standard error stream of the console.
- Click Save to apply the settings.
Log configuration can also be achieved by the following ways:
Previous Page Next Page