 Previous Page Next Page
Setting Up and Configuring a JReport Server Cluster
Creating a JReport Server Cluster during installation
Creating a JReport Server Cluster after installation
Before setting up a JReport Server Cluster, first you need to make the time difference between the target computers that will join the cluster as small as possible (the time difference between the target computers should be within one minute), and make sure all servers in the cluster will be set up on the same architecture and operating system.
A JReport Server Cluster can be set up either during the JReport Server installation or after the servers have been installed using the appropriate license key for cluster.
Creating a JReport Server Cluster during installation
It is recommended that you create a JReport Server Cluster during the installation of servers. This is the easiest way for you to set up a cluster.
- Run the JReport Server installation file to install JReport Server with the Installation Wizard.
- Specifies your User ID. In the License Key text field, use the cluster enabled license key.
- When choosing the installation type, choose Custom Installation for Standalone Server. Then specify the installation directory for JReport Server.
- In the Service tab of the Configure System Environment screen, check the Network Address At option and type in the IP address of the server.

- Click the Cluster tab. Specify a cluster name in the Cluster Name text field. You can either make the server join an existing cluster or specify a new cluster name to build another cluster.
- Uncheck the Disable Cluster option at the bottom.
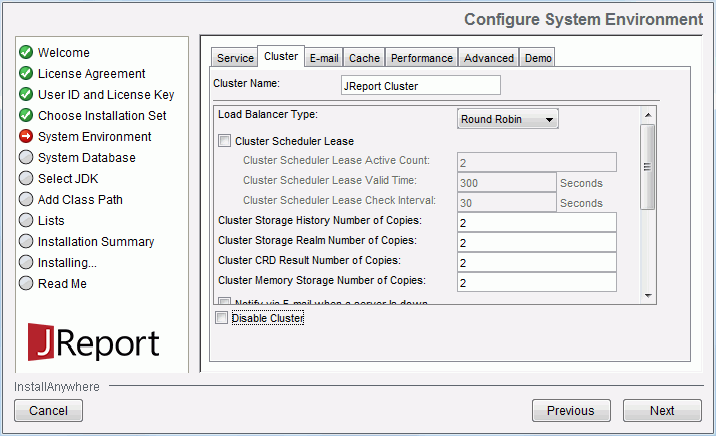
- From the Load Balancer Type drop-down list, select the built-in algorithm for load balancing clustered servers: Min-load, Round Robin, Weighted Min-load, or Random.
- Check the Cluster Scheduler Lease option to enable lease for the cluster, then set the active count, valid time and check interval in the following text fields for the cluster scheduler lease.
- Cluster Scheduler Lease Active Count
Specifies the active lease number in the cluster. By setting the active lease number, you get to know how many active schedulers there are to compete to trigger the schedule. The property value should be an integer and the default value is 2.
- Cluster Scheduler Lease Valid Time
Specifies the period of time that the clustered server can hold a lease before releasing it. The property value should be an integer in seconds and the default value is 300.
- Cluster Scheduler Lease Check Interval
Specifies the time interval the cluster will use to check the number of active leases. The property value should be an integer in seconds and the default value is 30.
Lease is a semaphore that enables a scheduler to be an active scheduler. If a scheduler is enabled with lease, it becomes an active scheduler and will compete to trigger the schedule. Each active scheduler can hold a lease for a period of time, which depends on the value you set in the Cluster Scheduler Lease Valid Time text field, and then transfers it to another scheduler in the cluster. If you don't enable Cluster Scheduler Lease, all clustered servers in the cluster will compete for a chance to trigger scheduled tasks which could lower overall system throughput. See main features for additional information.
- In the Cluster Storage History Number of Copies,
Cluster Storage Realm Number of Copies and Cluster Storage CRD Result Number of Copies text fields, specify how many copies will be made in the cluster when a new file or folder is added to the history, realm and cached report data (CRD) result folders respectively. If you are using shared disk resources for any of these directories you should set the value to 1. The default value is 2 which means make one copy plus the original. This allows any one node to go down and the system will still be able to find all resources. If you want to allow 2 simultaneous failures, set the number of copies to 3.
- In the Cluster Memory Storage Number of Copies
text field, specify how many memory copies will be shared in the cluster. The property value should be a positive integer and the default value is 2. If there are quite a few clustered servers in a JReport cluster, sharing memory in all cluster nodes would increase the network load exceedingly which may lead to poor server performance and scalability.
- Check Notify via E-mail When a Server Is Down if you need to notify somebody via e-mail when a server in the cluster is down, then in the E-mail Address text field, input the e-mail addresses of the people to whom you want to send a notification e-mail.
- In the following text fields, specify the corresponding directories if necessary. If they are not set, the default directories will be used.
- Properties Directory
Specifies the properties directory for storing system data. The properties directory of each clustered server should better point to a different physical location.
- Realm Directory
Specifies the realm directory for storing system data. The realm directory of each clustered server should better point to a different physical location.
- Resource Root
Specifies the report root directory for storing system data. The resource root of each clustered server should better point to a different physical location.
- History Directory
Specifies the directory for storing report/catalog/result files. The history directory of each clustered server should better point to a different physical location.
- Temporary Files Directory
Specifies the directory for storing temporary result files. Along with the running of JReport Server, temporary result files (generated by background run) will be written to the temp directory. Each clustered server should use an individual temp folder to store its temporary files generated during its working process.
- In the Server's RMI Host text field, type the RMI IP address or host name of the clustered server which can be accessed by other servers that will join the cluster.
- In the Server's RMI Port text field, type the RMI port number of the clustered server.
- Go on with the installation steps to complete the installation.
- Install other servers you want to join the cluster and repeat the above steps to configure the cluster settings. When some servers are installed on the same machine, you need to make sure they use different port numbers. For options that take effect on the cluster level such as Load Balancer Type, Cluster Scheduler Lease, cluster storage copies, e-mail notification setting, you do not need to set them repeatedly.
Since JReport Cluster uses the same server DBMS, you need to make the system database in the JDBC URL text field point to the same DBMS as the previous server. This requires that you replace localhost with the IP address of the first cluster node that you installed, for example, jdbc:derby://IP:8886/.
Creating a JReport Server Cluster after installation
After the servers have been installed using the appropriate license key for cluster, you can configure them either via the JReport Administration > Cluster page or using files to set up a cluster.
To configure a cluster via the JReport Administration > Cluster page:
- Start up the server that hasn't been enabled for cluster.
- Log onto the JReport Administration page.
- Click Cluster on the system toolbar and select Configuration from the drop-down menu.
- In the Cluster Name text field, specify a name for the cluster. You can either make the server join an existing cluster or specify a new cluster name to build another cluster.
- Check the Enable Cluster option.
- Click Save to enable the cluster.
A cluster member ID will be generated automatically for the server. If you need to modify it, you need to go to server.properties located in <install_root>\bin and set the property cluster.member.id. However it is strongly recommended that you do not change the auto generated cluster member ID in a JReport cluster, because distributed storage uses the member ID to recognize on which clustered server the physical files are stored.
- Go to the JReport Administration > Data page, configure the databases to make sure they point to the database that the server will use. For details, see Configuring the Server Database.
- Restart the server you have enabled with cluster, then log onto the JReport Administration page.
- Click Cluster > Configuration on the system toolbar to open the Cluster - Configuration page.
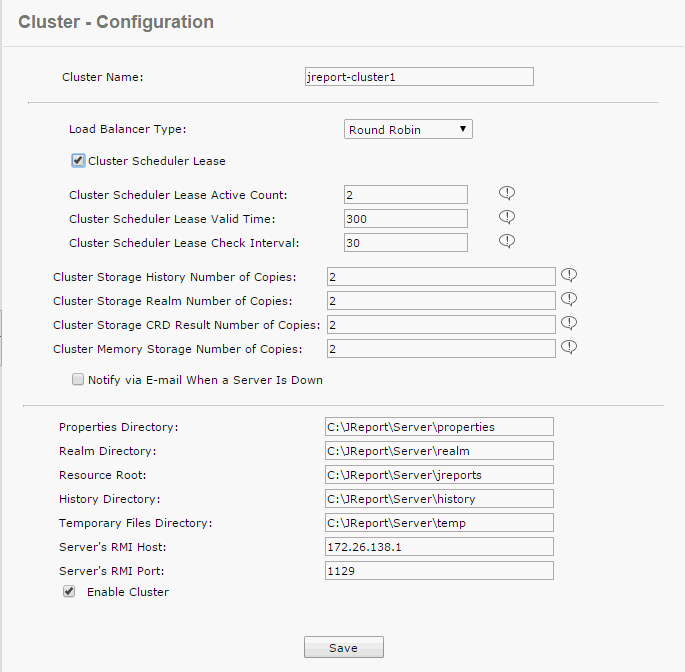
- Configure the server as described from step 7 to 14 in the above procedure.
- Shut down the server.
- Start up another server you want to join the cluster and repeat the above steps to configure its cluster settings. If the servers are on the same machine you need to make sure they use different port numbers. For options that take effect on the cluster level such as Load Balancer Type, Cluster Scheduler Lease, cluster storage copies, e-mail notification setting, you do not need to set them repeatedly.
To set up a cluster using files:
- In the server.properties file located in
<install_root>\bin of each server, set the property cluster.enabled=true.
- Modify cluster.name in any server's server.properties file to specify the cluster name. If not specified, it will take jreport-cluster as the default name.
- In the server.properties file of each server modify the two properties:
- server.rmi.host=localhost IP address
Specifies the RMI IP address or host name of the server which can be accessed by other servers in the cluster.
- server.rmi.port=1129
Specifies the RMI port number of the server. When the servers in the cluster are on the same machine, you must edit this property to make the servers use different port numbers.
- Modify dbconfig.xml saved in
<install_root>\bin for each server. Make sure that the system database and realm database all servers in the cluster use point to the same DBMS.
Notes:
- The databases that can be used as the server database in a JReport cluster must be able to support the lock function, therefore, you cannot use HSQLDB as the server's database in a JReport cluster because HSQLDB doesn't support the function.
- If you have upgraded your JReport Server which is cluster enabled and uses HSQLDB as the server database from versions prior to V9 to the current version, in order to make the server work normally, you need to disable cluster on the server by adding the line server.cluster.enable=false to the server.properties file.
- If you set up a JReport cluster on one computer, you need to make sure that the settings of HTTP Port, Administration Port, and Server's RMI Port on each clustered server are different.
- If you want to use resources from folder real paths in a JReport cluster, you should first specify a disk in your file system and make sure that every clustered server in the cluster has the same disk name mapping to the same physical location.
- In order to fax report result successfully in a cluster, you need to configure the fax settings for each clustered server respectively.
- When a cluster is enabled the following properties and their mapping UI options will also be saved into the system database.
- The following properties in the server.properties file: cluster.enable_notify_server_down, cluster.notify_server_down_address, cluster.scheduler.lease.active_count, cluster.scheduler.lease.check_interval, cluster.scheduler.lease.enabled, cluster.scheduler.lease.valid_time, cluster.send_concurrent_reports, cluster.share_memory.node_number, cluster.storage.crd_result.copy_number, cluster.storage.history.copy_number, cluster.storage.realm.copy_number, loadbalance.custom_class, loadbalance.type, server.autocache.enabled, server.autocache.expired.time, server.autocache.max.disk.usage, server.autocache.never.expire, server.completed.max_count, server.crd.memory.usage, server.realm.active, server.security, server.version.from.temp.
- All properties in the mailconfig.properties file in
<install_root>\bin.
- All properties in the LDAP configuration XML file LDAPProperties.xml in
<install_root>\properties.
Previous Page Next Page