 Previous Page Next Page
Mapping Data Values to Different Languages
Creating a data mapping file
Editing a data mapping file
Applying a data mapping file
With the Data Mapping Editor, you can create data mapping files to map data values of resources in a catalog to a specific language as you like. A data mapping file is a property file used to store the target language information for resources in a catalog (DBFields, parameters, summaries, formulas, table/view/synonym columns, imported SQL columns and so on). One data mapping file stores one language, and the name of the file is in the format "FileName_language_locale.properties". The abbreviations of the language and locale are used in the mapping file name. For example, the German mapping file name will be like this: FileName_de_DE.properties. The lower case "de" indicates the language is German, the upper case "DE" indicates the region is Germany. If all German regions can use the same file then the file name can be just FileName_de.properties.
Creating a data mapping file
To create a data mapping file, that is to map the data values of resources in a catalog to a specific language, follow the steps below:
- On the Catalog Manager toolbar, click the Data Mapping Editor button to display the Data Mapping Editor.
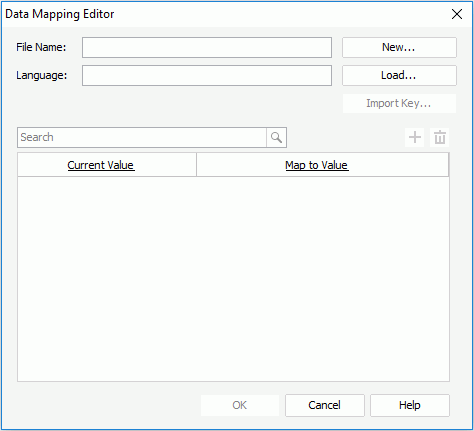
- Click the New button and the Create Data Mapping File dialog appears.
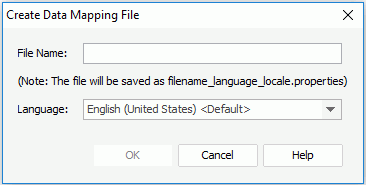
- In the File Name field, specify the name of the mapping file.
- Click the Language drop-down list and select to which language the data values in the catalog will be mapped.
- Click OK, and a property file will then be created in the folder where the catalog file is.
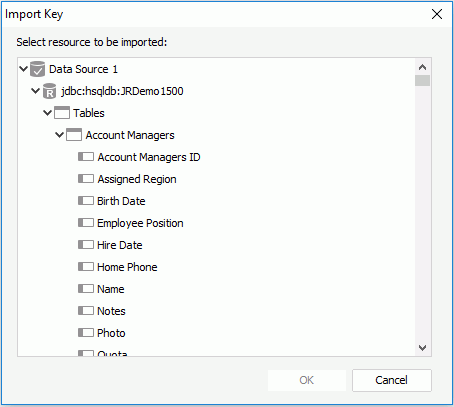
- In the Data Mapping Editor, click the Import Key button to import the resources with the data values you want to map from the Import Key dialog.
- Double-click cells in the Map to Value column to specify the mapping values for the imported resources according to the selected language. Use the quick search toolbar to locate the desired values in the value list if needed.
- From the Import Key dialog, you can only import part of the resources in a catalog. If you want to map values of other resources like summaries, click
 to add a mapping line and specify the value in the Current Value column and Map to Value column accordingly.
- When done, click OK to accept the changes and close the dialog.
Editing a data mapping file
To edit an existing data mapping file:
- In the Data Mapping Editor, click the Load button.
- In the Load Data Mapping File dialog, select the data mapping file you want to edit and click Open.
- Information that has been saved in the file is then loaded in the Data Mapping Editor. You can import/add more values to map, or delete some by clicking
 .
.
- When done, click OK to finish editing.
Applying a data mapping file
A data mapping file can be applied to the following objects:
- Objects in a catalog: table/view/synonym columns, aggregation objects, detail objects and group objects in business views, stored procedure columns, imported SQL columns, UDS columns, HDS columns, formulas, summaries and parameters.
- Objects in a report: DBFields, formulas, summaries, parameters and special fields.
To apply a data mapping file to objects in a catalog:
- Make sure that the option Forbid editing data object properties in the Catalog category of the Options dialog is unchecked so that the object property values in the Catalog Manager can be changed.
- Open the catalog and select the node that represents the object to which you want to apply the data mapping file.
- In the Properties sheet, set the data mapping file name (without the language and locale part) of the object as the value of the property Data Mapping File. For example, if the data mapping file name is Category_de_DE.properties, set the property value as Category.
To apply a data mapping file to objects in a report:
- Open the report, then in Report Inspector, select the node that represents the object to which you want to apply the data mapping file.
- In the Properties sheet, set the data mapping file name (without the language and locale part) of the object as the value of the property Data Mapping File. For example, if the data mapping file name is Category_de_DE.properties, set the property value as Category.
The data mapping file cannot take effect now because there is no NLS property file for the report. You have to create a corresponding NLS property file for the report using the NLS Editor. For details, see Creating NLS Property Files.
Note: When the same object is applied with a data mapping file both at the catalog level and report level, the file specified at the report level for the object has the higher priority. However, in the following two cases, if you want to apply a data mapping file to the object, you need to specify the file at the report level. The data mapping file specified at the catalog level cannot work under these two circumstances.
- When the object is used as group-by field in a table or banded object and a special function or special group is applied to it.
- When the object is added as the category or series field in a chart and any text or mapping format is specified for it.
Previous Page Next Page