 Previous Page Next Page
Dashboard Listener API defines the start and end events of adding and deleting library components for users to get dashboard related information at the event and to use the information in their own application.
Event types
Basic Information
For detailed usages about the Dashboard Listener API, see JReport Javadoc com.jinfonet.web.modules.dashboard package in <install_root>\help\api. Also, there is a sample implementation file DashboardListenerDemo.java in <install_root>\help\samples\APIDashboardListener.
Different uses should have different implementations of the Dashboard Listener API. The implementations can be managed on the server by administrators. After a new implementation is imported to the server and enabled, it will be able to take effect immediately without restarting the server.
Besides, after an implementation is uploaded to the server, you can apply it in the URL which is used for running dashboards. The URL way has higher priority than the enabled implementation on the JReport Administration page.
To import and enable an implementation on the JReport Administration page:
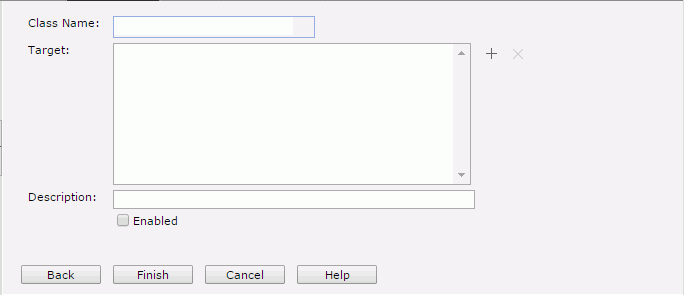
 beside the Target box, then in the Select Target dialog specify the target dashboards you would like the implementation to apply to: all dashboard including the unsaved ones, the newly created dashboards that have not been saved, or dashboards in the specified folders.
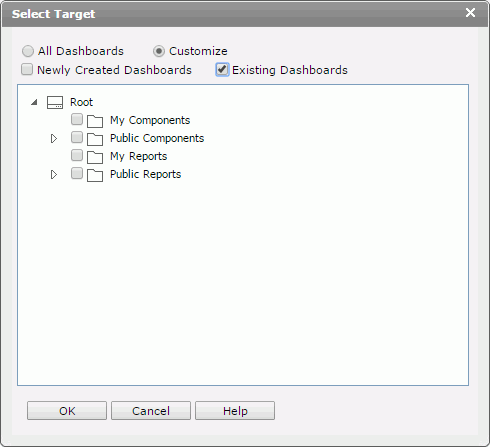
When all dashboards have been added, the button will be disabled. Later if you want to change the dashboards, you need to first delete the <All dashboards> item and then add other dashboards. To remove unwanted dashboards from the Target box, select them and then click  .
.
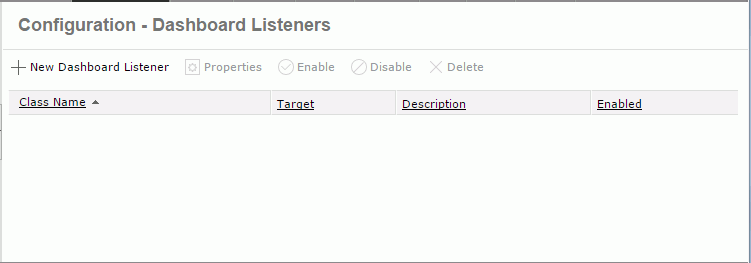
The registered implementation class is added in the class table on the Dashboard Listener page which consists of the following columns.
| Column Name | Description |
|---|---|
| Class Name | The implementation class name. Each is unique and cannot be null. |
| Target | Shows the resources that the implementation will take effect on. When a dashboard has been set as the target value of different implementations, the earliest implementation will take effect on the dashboard. |
| Description | The description of the implementation. |
| Enabled | Shows whether the implementation is enabled. |
In the class table, the system admin can perform the following on the implementations:
To apply an implementation via URL:
To apply the dashboard listener via URL, append the key-value pair jrd_dsh_listener=PackageName.ClassName in the URL which is used for running dashboards.
For example, if you want your implemented class TestListener to take effect on a new created dashboard (not the target defined on the JReport Administration page), you can define it in the URL. Such URL will not affect the setting on the JReport Administration page.
http://localhost:8888/dashboard/app/entry/run.jsp?jrs.authorization=YWRtaW46YWRtaW4%3D&jrd_dsh_listener=com.jinfonet.TestListener&jrd_resext={"active":0,"reslst":[{"name":"/USERFOLDERPATH/admin/Dashboard1.dsh","ver":"-1"}]}