 Previous Page Next Page
Example of Using Business View Security
This example is based on the business view WorldWideSalesBV in the SampleReports.cat catalog file. It is assumed that the server administrator has already created two users on JReport Server: User1 and User2, with the passwords abc and xyz respectively. We will create a security policy on SampleReports.cat to limit the two users' access to different group members of WorldWideSalesBV. Before starting the example, make sure JReport Server is started.
The example contains the following tasks:
Task 1: Set security on business view groups
Task 2: Create a crosstab and publish it to JReport Server
Task 3: View the crosstab
Task 1: Set security on business view groups
In this task, we will import the two server users to JReport Designer and limit their access to different members of the Region group in WorldWideSalesBV.
- Open the catalog file SampleReports.cat in
C:\JReport\Designer\Demo\Reports\SampleReports.
- In the Catalog Manager, go to the Data Source 1 > Security > Business View Security node, right-click and select Edit Business View Security from the shortcut menu.
- In the Edit Business View Security dialog, click
 and select Import from JReport Server.
- In the Connect to JReport Server dialog, specify the required connection information, then click Connect.
The principals created on the server will all be imported and listed in the Users/Groups/Roles box.
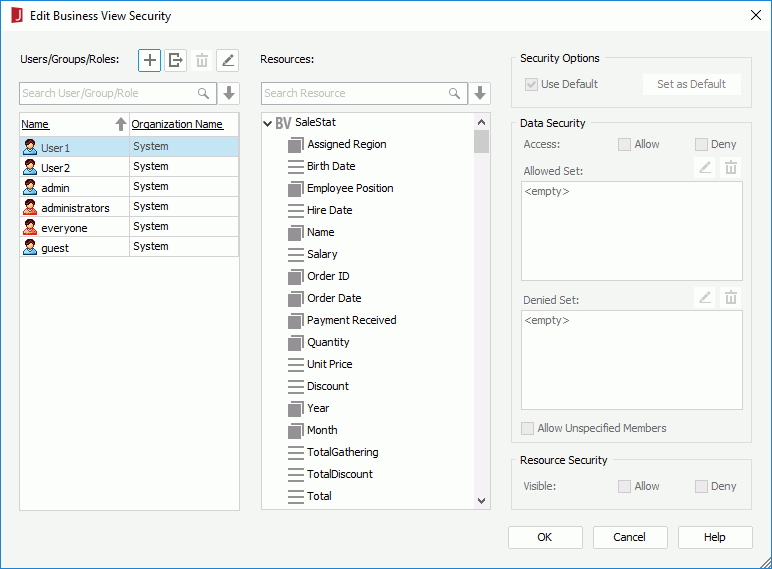
Next, we will assign field members availability to User1 and User2. We will make User1 have access on the North America region only and User2 regions other than North America.
- Select User1, in the Resources box select Region in WorldWideSalesBV.
- In the Security Options box, uncheck Use Default.
- In the Data Security box, allow the Access permission.
- Click
 above the Allowed Set box.
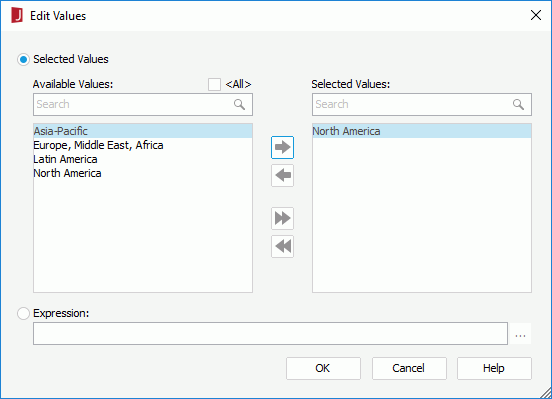
- In the Edit Values dialog, select North America from the Available Values box and click
 to add it to the Selected Values box, then click OK to close the dialog.
- In the Edit Business View Security dialog, uncheck the option Allow Unspecified Members, then in the Resource Security box, allow the Visible permission.
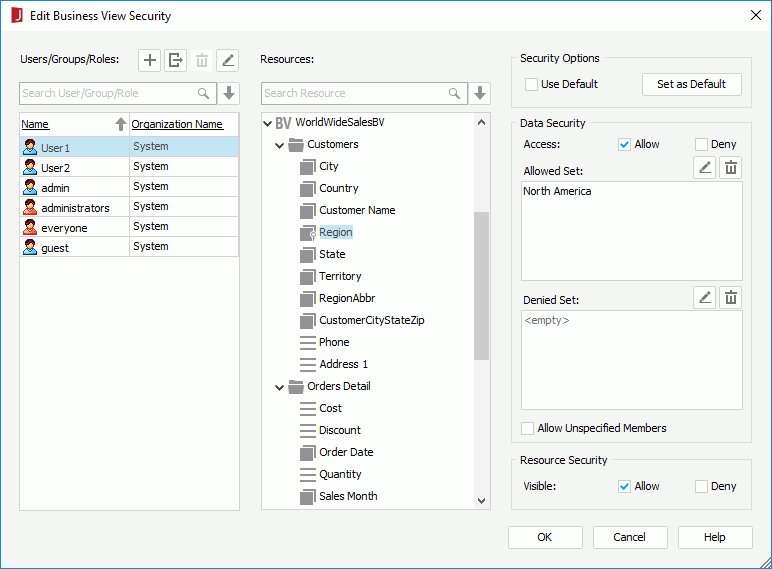
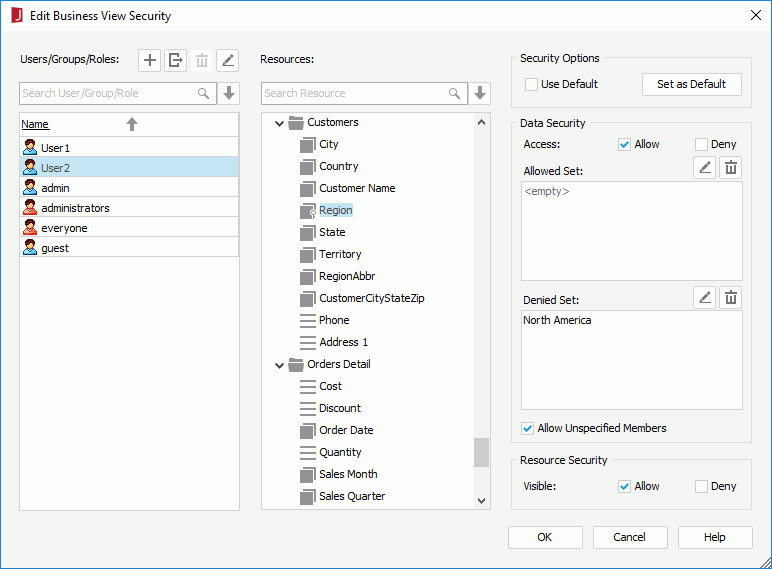
- Select User2 and the same field Region in WorldWideSalesBV, then uncheck Use Default in the Security Options box.
- In the Data Security box, allow the Access permission, then click above the Denied Set box.
- In the Edit Values dialog, select North America from the Available Values box and click , then click OK.
- In the Resource Security box, allow the Visible permission for User2.
- Click OK in the Edit Business View Security dialog to save the changes.
- Close the Catalog Manger.
Task 2: Create a crosstab and publish it to JReport Server
In this task, we will create a crosstab using WorldWideSalesBV and then publish it to JReport Server.
- In JReport Designer, click File > New > Web Report. A blank web report is created.
- Click Insert > Crosstab. The Create Crosstab wizard is displayed.
- In the Data screen, select WorldWideSalesBV under Data Source 1, then click Next.
- In the Display screen, select Region as the column field, Category as the row field, and Total Sales as the summary field. Click Finish to create the crosstab.
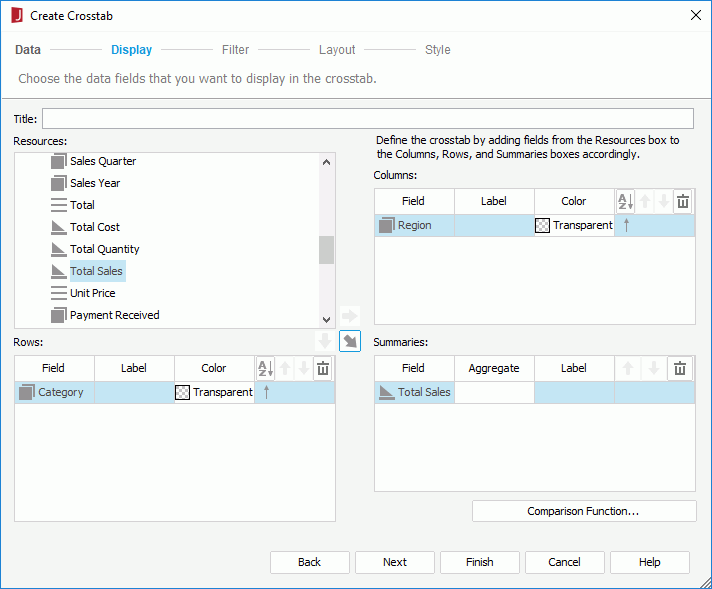
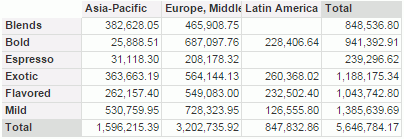
- Click the View tab to preview the crosstab. It shows full data.
- Go back to the Design tab and click File > Save to save the crosstab as mlscrstab.wls.
Next, we will publish the crosstab to JReport Server.
- Click File > Publish > Publish Report to Server.
- In the Connect to JReport Server dialog, specify the required connection information, then click Connect.
- In the Publish to JReport Server dialog, unselect the All checkbox and then select the SampleReports.cat and mlscrstab.wls only.
- Click the Browse button next to the Publish Resource To text field, then in the Select Folder dialog, select Public Reports in the Folder box and click OK.
- In the Publish to JReport Server dialog, click the More Options button, select mlscrstab.wls in the resource box, then on the right panel, switch to the Permissions tab.
We will grant the two users the necessary permissions on the web report, so that after the report is published to JReport Server, they are able to run them.
- Select the Enable Setting Permissions checkbox, click the User sub tab, select User1 in the user box and check the Visible and Execute checkboxes; select User2 and do the same.
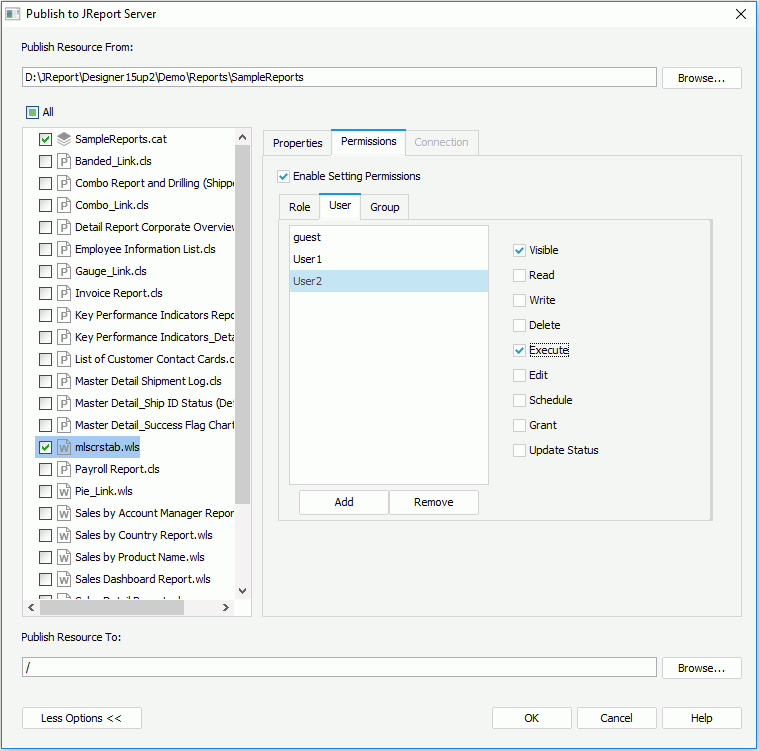
- Click the OK button to publish the resources to JReport Server.
Task 3: View the crosstab
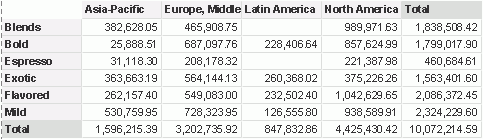
Now, we can log onto JReport Server as User1 and User2 separately to view the crosstab.
- Log onto the JReport Server user console as User1 with the password abc.
- Open the Public Reports folder and run the web report mlscrstab.wls. The result will be:
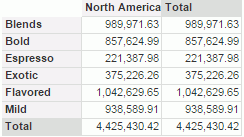
- Log out and then log in again as User2 with the password xyz. Run the report and the result will be:
Previous Page Next Page