 Previous Page Next Page
Editing the properties of an item
Searching for a report or folder item
Exporting the report information to a table
All created page report files (.cls) are physically placed in the same directory where the catalog file resides. Due to this, you will not be able to get detailed information about a page report until it is opened in JReport Designer. For example, if you want to find a page report with a special condition, you will have to load each page report. For just a few page reports, this is not a problem. However, the case is different when there are many reports.
JReport provides you with a tool for managing page reports by means of adding them into folders with the Manage Page Reports dialog. You can build folder items in the manager, helping you to divide the page reports into different types at your disposal. Then, the reports can be added to the folder, and worked on just like processing files in a file system--add, open, delete, move, rename and search items. In all, the feature of report folder implemented in catalogs enables you to manage your page reports in a way that can better satisfy your requirements.
The following are some concepts used in the Manage Page Reports dialog:
To display the Manage Page Reports dialog, click Report > Manage Page Reports.
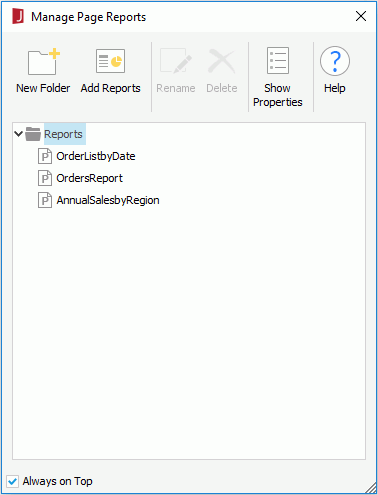
You can manage your page reports in the current catalog with the Manage Page Reports dialog as follows:
To add a folder item to the Manage Page Reports dialog:
Now, a new folder is added as a sub node, and the default name for the folder is Folder1, Folder2.... You can rename the folder as required.
To add report items to the Manage Page Reports dialog:
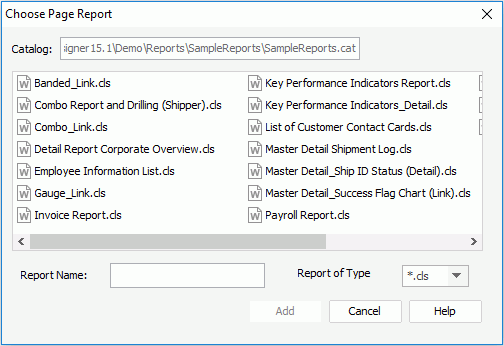
A report can be added to multiple folders in case you want to include it in multiple categories. You can double-click any report item in the Page Report Manager to open the report.
Select the item the properties of which you want to edit, click Show Properties on the toolbar, then edit its property values in the Properties sheet. After editing a value, press Enter on the keyboard to confirm the change. You can make use of the quick search toolbar to search for the desired properties (to display the toolbar, click the Search button  at the upper right corner of the Properties sheet). The search toolbar is closed when you select another item.


The properties of a folder item are:
| Property Name | Description |
|---|---|
| Description | Specifies the description of the folder.
Data type: String |
| Name | Specifies the name of the folder.
Data type: String |
The properties of a report item are:
| Property Name | Description |
|---|---|
| Author | Specifies the author of the report.
Data type: String |
| Description | Specifies the description of the report.
Data type: String |
| File Name | Specifies the name of the report.
Data type: String |
| Keywords | Specifies the keywords of the report.
Data type: String |
| Last Modified Time | Specifies the last time at which the report was modified.
Data type: String |
| Last Print Time | Specifies the last time at which the report was printed.
Data type: String |
| Last Run Time | Specifies the last time at which the report ran.
Data type: String |
| Name | Specifies the display name of the report.
Data type: String |
| Query Name | Specifies the query
used by the report.
Data type: String |
| Value Type | Specifies the type of the report.
Data type: String |
Wildcard searches for report name or folder name in the Manage Page Reports dialog are supported. To search a report or folder item, follow the steps below:
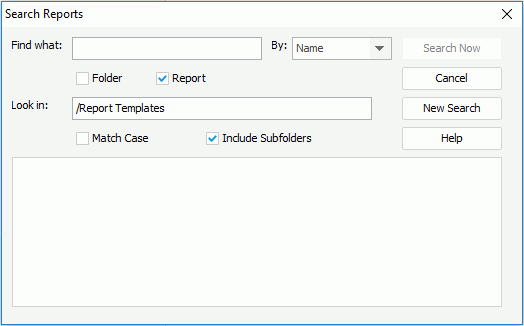
If you just input part of the report or folder name, or report keywords, use * to replace the other part of the name or keywords. For example, if you want to search for the report EmployeeInformation, you should input *Info* instead of info in the text box.
You can export report information in the Manage Page Reports dialog to a table in a DBMS. The default name of the table is ReportsInfo. You can change the name as required. Each row of the table is a report description. To do this:
You can then set up a JDBC connection in a catalog to connect with the DBMS and add the table to the catalog via the JDBC connection for use.
Note: If a table already exists, it will be replaced. So you must be sure that there are no duplicate names in the DBMS.
Any items added to the Manage Page Reports dialog can be moved to another folder if required. You can use either of the following methods to move an item:
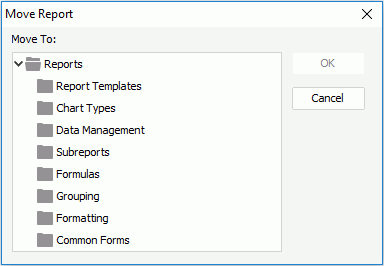
Drag the item to the destination folder.
Using the Manage Page Reports dialog, you can delete reports from the file system.
To delete items from the Manage Page Reports dialog:
If a report is deleted manually from the local file system, later when you open the Manage Page Reports dialog, you will see the node icon that represents the report is marked with a red cross. You can use the above method to remove the unused node.