 Previous Page Next Page
Predefining Sort and Filter Conditions
You can predefine sort and filter conditions for the data components banded objects, tables, charts and crosstabs in page reports, so that when the page reports are published to JReport Server and are loaded in Page Report Studio, data in the components will be displayed in the order you prefer, or be narrowed down as you desire.
To predefine sort conditions for a data component:
- Select the component to which the sort conditions will apply.
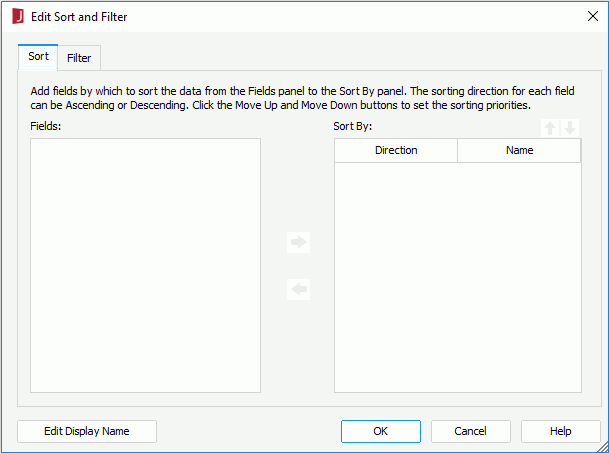
- Click Report > Edit Sort & Filter to show the Edit Sort and Filter dialog. The Sort tab is active by default.

- In the Fields box, all the fields in the dataset the component uses are displayed. Select the field by which to sort the data from the box and click
 to add it to the Sort By box. To sort by two or more fields, select all of them and then click
  .
.
- To modify the sort direction for a field, select
 (ascending) or
  (descending) in the Direction column.
- To change the sort priority of the fields, select the field in the Sort By box, and then click
 or
or  to move it up or down.
- Click OK to accept the settings.
To predefine filter conditions for a data component:
- Select the component to which the filter conditions will apply.
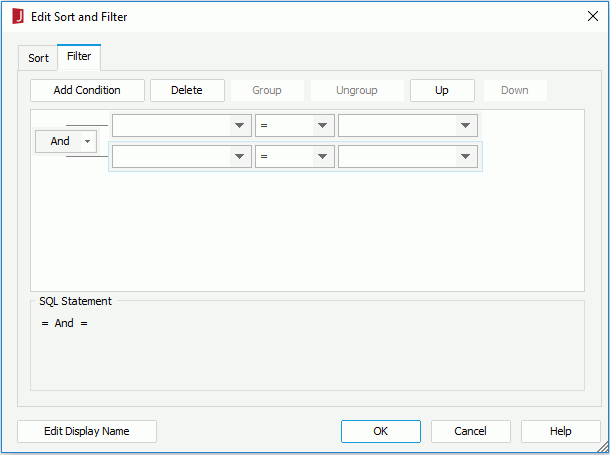
- Click Report > Edit Sort & Filter to show the Edit Sort and Filter dialog, then switch to the Filter tab.

- Click the Add Condition button to add a condition line.
- From the field drop-down list, select the field on which the filter will be based.
- From the operator drop-down list, set the operator with which to compose the filter expression.
- In the value combo box, type the value of how to filter the field or select the value from the drop-down list.
- Click Add Condition to add more condition lines and define the logic between the condition lines.
To make some condition lines grouped, select them and click the Group button, then the selected condition lines will be added in one group and work as one line of filter expression. Conditions and groups together can be further grouped. To take any condition or group in a group out, select it and click Ungroup.
To adjust the priority of the condition lines, select it and click the Up or Down button.
To delete a condition line, select it and click the Delete button.
- Click OK to save the condition.
Notes:
- If the Customize Display Name feature hasn't been applied to the dataset on which the component is created, when you open the Edit Sort and Filter dialog, there will be no fields displayed either in the Fields box of the Sort tab or the field drop-down list in the Filter tab, in which case, you need to click the Edit Display Name button in the dialog first to enable the feature on the dataset. You can also modify the display names in the Edit Display Name dialog if desired.
- The predefined sort and filter conditions will also affect the preview result in JReport Designer, and the result produced from being run in other formats besides Page Report Studio.
 Previous Page Next Page
 Previous Page Next Page

 to add it to the Sort By box. To sort by two or more fields, select all of them and then click
  .
. (ascending) or
  (descending) in the Direction column.
 or
or  to move it up or down.