 Previous Page Next Page
Sending Messages
An object in a library component can send out different messages when different events occur on it to ask the message receivers to perform specific web actions based on the defined conditions in the messages.
The messages that can be sent out from an object include the built-in messages and user customized messages. In a customized message you can specify to send out multiple messages from one object on different trigger events and edit the message information as you want. The following built-in messages are provided:
- Filter
The Filter built-in message is sent out for asking the message receivers to filter themselves based on the filter condition defined in the message.
- Sort
The Sort built-in message is sent out for asking the message receivers to sort themselves based on the sort condition defined in the message.
- Parameter
The Parameter built-in message is sent out for asking the library components that contain the message receivers to re-run using the specified parameter values in the message. It has two sub types:
- Automatic
This Parameter message type automatically contains all the parameters used in the current library component.
- Customized
Using this Parameter message type, you can customize the parameter you want to include in the message.
In a library component the following objects can be used as the trigger objects to send out messages: labels, data fields, special fields, data markers, legend and category axis labels of charts, markers and areas in geographic maps, parameter controls, and the Submit button of parameter form controls.
To send out a message:
Select the trigger object, right-click it and click Send Message > Filter/Sort/Parameter/Customize on the shortcut menu (for the Submit button of a parameter form control, only Parameter and Customize are available).
- If Filter is selected, a built-in Filter message will be sent out when the Click event occurs on the object at runtime, which will ask the message receivers to filter themselves using the default filter condition Current Field = Current Value. You can edit the filter condition when specifying the message receivers if necessary.
- If Sort is selected, a built-in Sort message will be sent out when the Click event occurs on the object at runtime, which will ask the message receivers to sort themselves using the default sort condition Current Field Ascending. You can edit the sort condition when specifying the message receivers.
- If Parameter is selected, a built-in Parameter message of the Automatic type that contains all the parameter values in the current library component will be sent out when the Click event occurs on the object at runtime, which will ask the library components that contain the message receivers to re-run using the same parameter values. You can edit the parameter values when specifying the message receivers.
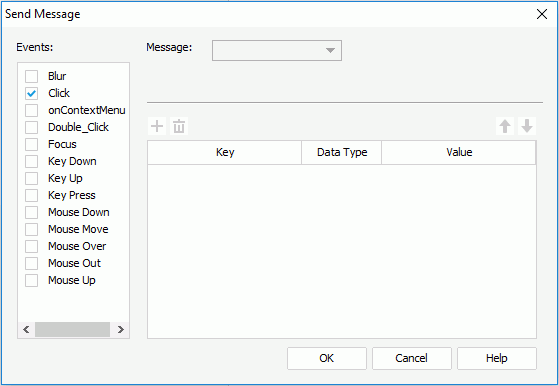
- If Customize is selected, you can define the message by yourself in the Send Message dialog.

- Check a trigger event in the Events box, then click on the name of the event to select it.
- From the Message drop-down list, select the message to be sent out when the selected event is triggered on the object at runtime: 0001 - Filter, 0002- Sort, 0003 - Parameter, or User Defined.
- Define the message as you want.
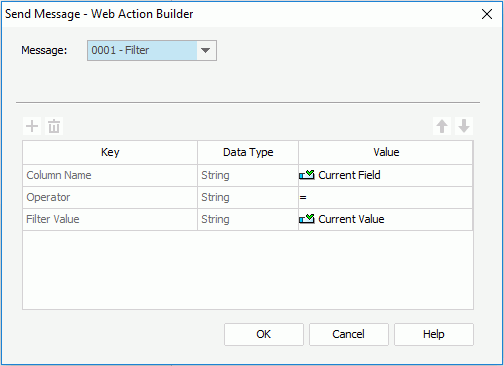
For the built-in message, you can edit the condition of how to perform the web action bound with the message in the Value column. To make the condition dynamic, select the values under the Dynamic Key node.
For a user defined message,
- Specify the ID and Name of the message in the ID and Name text boxes. The ID should be a natural number beyond 1000.
- Click
 to add a message key-value line.
- In the Key column, specify a key from the drop-down list or select the <Input...> item from the list and then input a key into the text box.
- In the Value column, specify the value of the key from the drop-down list or select <Input...> from the list and then input a value into the text box.
- If you choose to input the value by yourself in the above step, you need to specify the data type of the value. If the value is selected from the Value drop-down list, the data type of the value is automatically displayed in the Data Type column and cannot be changed.
- If necessary, add more key-value lines and specify the key, data type and value in each line.
To delete a message key-value line, select it and click  . To adjust the order of the lines, click
  or
or  .
.
Tip: You can also create a blank user defined message by only specifying the ID and name of the message.
- Repeat the above steps to define other messages that will be sent out from the object on different events.
- Click OK to accept the settings.
In addition to the above method, you can also use the Send Message web action to define the messages to be sent out. To do this:
- Do one of the following to open the Send Message - Web Action Builder dialog.

- Right-click a data field, or a label in a table/crosstab, or a label, a parameter control or the Submit button of a parameter form control which is not in the library component's configuration panel, select Display Type from the shortcut menu. In the Display Type dialog, select a trigger event from the drop-down list in the Events column and click
 in the Actions column.
- In the Behaviors tab of some chart formatting dialogs, select a trigger event from the drop-down list in the Events column and click
 in the Actions column.
- While creating or editing a geographic map, in the Display screen of the map wizard, select a group level and click the Web Behaviors button. In the Web Behaviors dialog, select a trigger event from the drop-down list in the Events column, click in the Actions column and click
 in the Actions column.
- In the Web Action List dialog select *SendMessage and click OK.
- Define the message that will be triggered on the specified event.
- Click the OK button to confirm the settings.
- In the dialog you are returned to, add more event lines and repeat the above steps to specify to send out more messages as you want.
- When done, click OK to finish defining the messages to send out.
 Previous Page Next Page
 Previous Page Next Page

 to add a message key-value line.
 . To adjust the order of the lines, click
  or
or  .
.
 in the Actions column.
 in the Actions column.
 in the Actions column.